 Save Pin
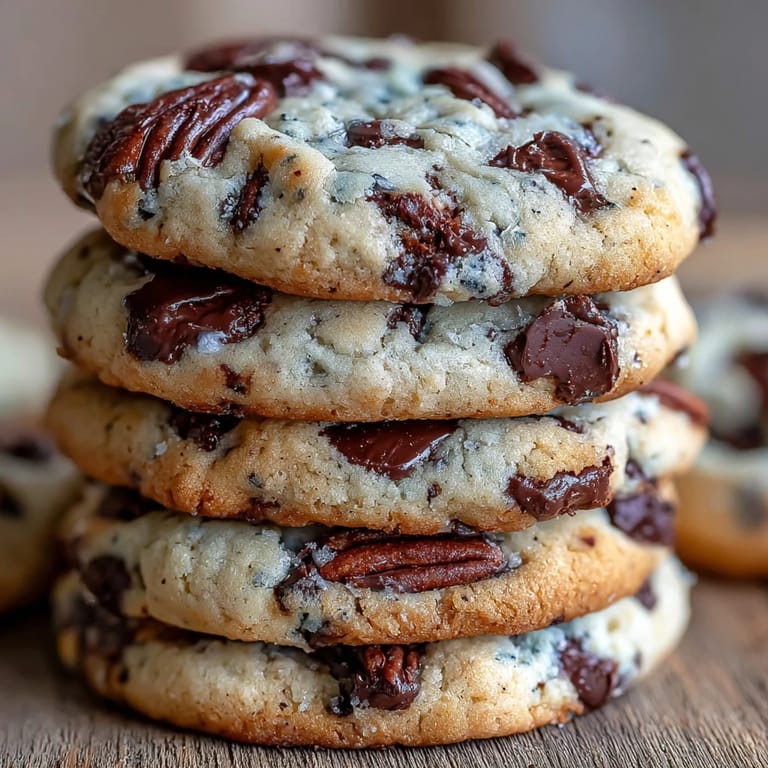
 The first time I made these cookies, I was completely out of eggs and had a desperate craving for something sweet and chocolatey. My grandmother had mentioned once that yogurt could work as a substitute, so I decided to experiment. The dough felt different than what I was used to—slightly tackier, almost alive in the bowl—but when they came out of the oven, soft and golden with that perfect slightly underbaked center, I knew I had stumbled onto something wonderful. My husband took one bite and asked what made them so incredibly tender, and I just smiled and said, 'Magic.' They have become my go-to whenever we need comfort food without an extra trip to the grocery store.
Last summer, my daughter had her best friend over for a sleepover, and they decided they wanted to bake something together. I showed them this recipe because it is forgiving enough for beginners but impressive enough to make them feel like real bakers. The kitchen was filled with laughter and the smell of melting chocolate as they took turns mixing the sticky dough. When the cookies came out of the oven, they sat at the counter with glasses of milk, warm cookies in hand, talking about everything and nothing. That is when I realized these were not just cookies—they were memory makers, the kind of simple pleasure that childhood is built on.
Ingredients
- Unsalted butter: Room temperature butter creates the perfect foundation for creaming with sugars, resulting in those tender edges we all love
- Granulated sugar and brown sugar: The combination gives you crispy edges from the white sugar and chewy centers from the molasses in the brown sugar
- Plain Greek yogurt: This is the secret ingredient that adds moisture and tenderness while replacing eggs completely—regular yogurt works too but Greek gives better structure
- Vanilla extract: Do not skimp here because real vanilla makes all the difference between good cookies and great ones
- All-purpose flour: The structure builder that holds everything together while still allowing for that soft texture
- Baking soda and salt: Essential for the right amount of spread and flavor enhancement
- Semi-sweet chocolate chips: The classic choice that balances sweetness perfectly, though milk chocolate or dark chocolate work beautifully too
Tired of Takeout? 🥡
Get 10 meals you can make faster than delivery arrives. Seriously.
One email. No spam. Unsubscribe anytime.
Instructions
- Getting Ready:
- Preheat your oven to 375°F and line baking sheets with parchment paper—this prevents sticking and makes cleanup so much easier
- Creating the Base:
- Beat together the butter, granulated sugar, and brown sugar until the mixture looks pale and fluffy, about 2 to 3 minutes, which incorporates air for lighter cookies
- Adding the Magic:
- Mix in the Greek yogurt and vanilla extract until everything is well combined and the mixture looks smooth and creamy
- Preparing the Dry Ingredients:
- In a separate bowl, whisk together the flour, baking soda, and salt so they are evenly distributed before adding them to the wet mixture
- Bringing It Together:
- Gradually add the dry ingredients to the wet mixture, mixing just until combined—the dough will be sticky and that is completely normal
- The Best Part:
- Fold in the chocolate chips until they are evenly distributed throughout the dough, reserving a handful to press into the tops before baking if you want extra chocolate showing
- Scooping and Spacing:
- Drop generous tablespoonfuls onto the prepared baking sheets, leaving at least 2 inches between each cookie because they will spread as they bake
- The Golden Moment:
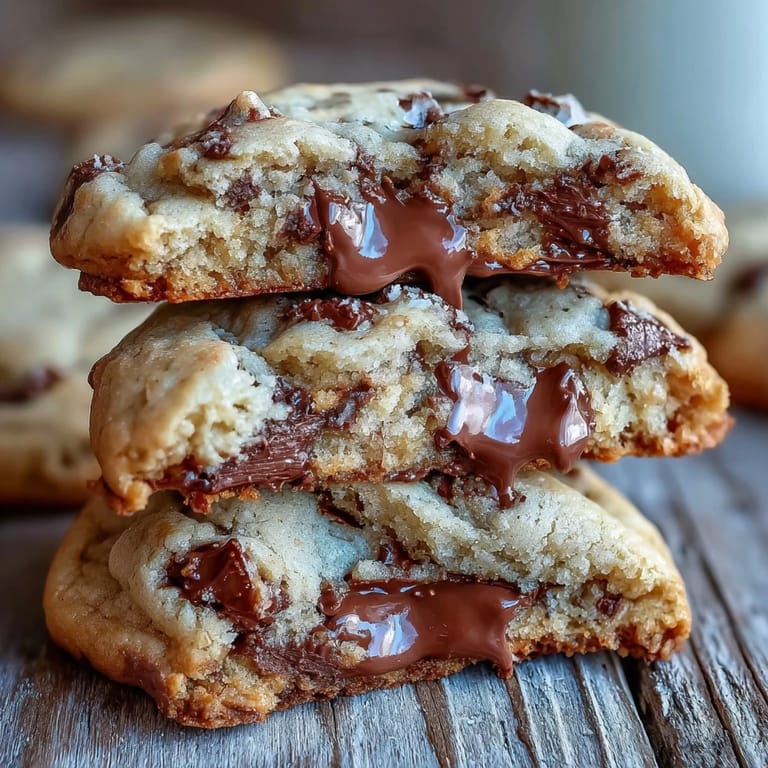
- Bake for 9 to 12 minutes, watching for those gorgeous golden edges while the centers still look slightly soft
- The Hardest Part:
- Let the cookies cool on the baking sheet for 10 minutes before moving them to a wire rack—this patience pays off with perfectly set centers
 Save Pin
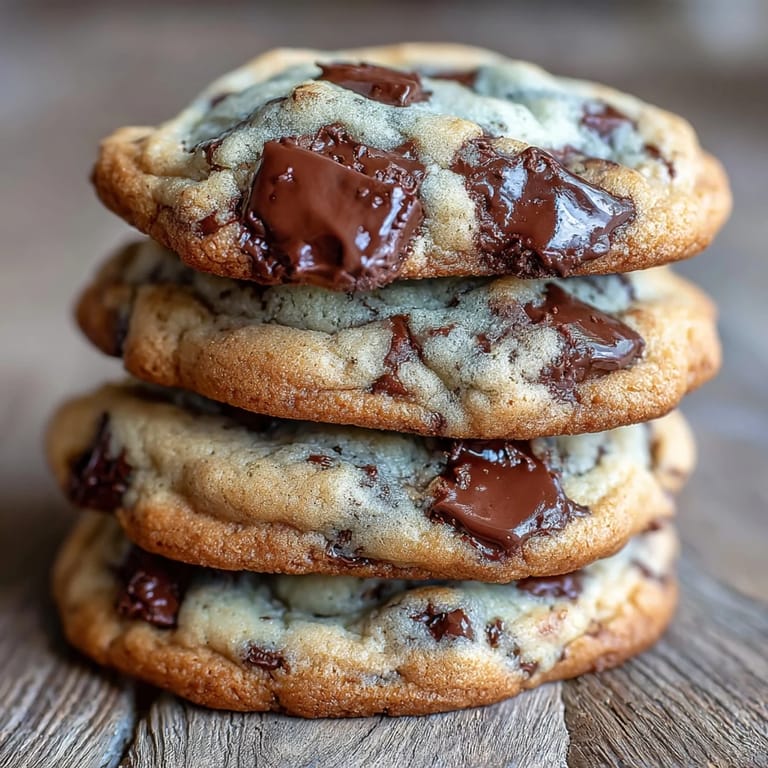
 These cookies have become such a staple in our house that my six-year-old son now knows the recipe by heart. Last week, he came home from school and said, 'Mom, can we make the yogurt cookies because Sarah at school said she has never had a homemade cookie before.' We made a double batch, and he proudly took a container to school the next day. When I picked him up, he was beaming—Sarah had told him they were the best cookies she had ever tasted, and she asked if he could bring more next week. There is something incredibly special about watching your child find joy in giving something they created with their own hands.
Making Them Your Own
Once you have mastered the basic recipe, try mixing in chopped walnuts or pecans for a lovely crunch that complements the soft texture. A pinch of cinnamon added with the dry ingredients creates a warmth that reminds everyone of snickerdoodles but with a sophisticated twist. During the holidays, I have been known to swap the chocolate chips for white chocolate and dried cranberries, creating a cookie that looks festive and tastes like winter comfort.
Storage Secrets
These cookies actually improve slightly on the second day as the flavors meld together, though they rarely last that long in our house. Store them in an airtight container with a slice of bread to maintain that just-baked softness for up to four days. If you want to freeze the dough, scoop it onto a baking sheet, freeze until solid, then transfer the frozen dough balls to a freezer bag—you can bake them straight from frozen, just add an extra minute or two to the baking time.
Serving Suggestions
Warm these cookies for 15 seconds in the microwave before serving and watch how the chocolate chips turn into little puddles of melty goodness. They are perfect alongside a cold glass of milk, naturally, but also pair beautifully with hot chocolate on snowy afternoons or even crumbled over vanilla ice cream for an instant dessert. I have also been known to sandwich two cookies with a bit of vanilla ice cream in the middle for an impromptu ice cream sandwich that makes everyone smile.
- Try sprinkling a little flaky sea salt on top before baking for that sweet and salty combination that everyone seems to love these days
- If your dough feels too sticky to scoop, refrigerate it for 15 to 20 minutes until it is more manageable
- These cookies freeze beautifully baked or as dough, so doubling the recipe is never a bad idea
 Save Pin
 There is something wonderfully uncomplicated about a cookie that brings so much joy with such simple ingredients. Whether you are baking for a crowd, a school event, or just a Tuesday night craving, these yogurt chocolate chip cookies have a way of making ordinary moments feel a little more special.
Recipe FAQs
- → Why use Greek yogurt in cookies?
Greek yogurt adds moisture and tenderness while replacing eggs. It creates a softer, chewier texture and brings a subtle tang that balances the sweetness.
- → Can I substitute regular yogurt?
Yes, plain regular yogurt works perfectly. The texture may be slightly less thick, but the results remain delicious.
- → Why is the dough sticky?
The yogurt creates higher moisture content. This stickiness ensures soft, chewy cookies. Chill the dough briefly if it's too difficult to handle.
- → How do I know when cookies are done?
Bake until edges are golden brown, about 9-12 minutes. Centers will appear slightly underdone but firm as they cool.
- → Can I add mix-ins beyond chocolate chips?
Absolutely. Chopped nuts, dried fruit, or a pinch of cinnamon complement the yogurt base beautifully. Keep total add-ins to 2 cups maximum.
- → How should I store these cookies?
Keep in an airtight container at room temperature for up to 4 days. The yogurt helps maintain softness longer than traditional versions.