 Save Pin
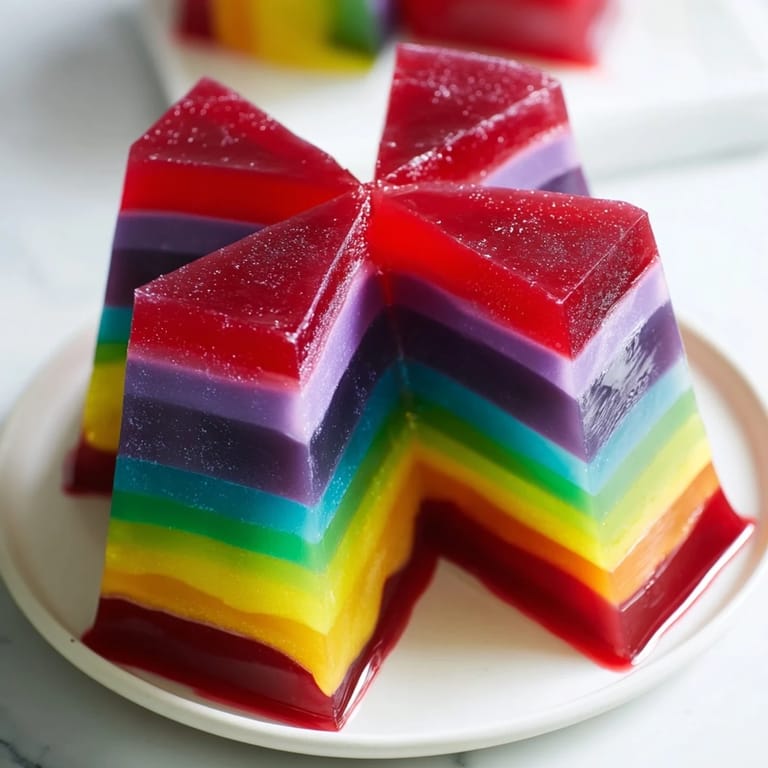
 The first time I made The Kaleidoscope, I was determined to impress at a dinner party and somehow prove to myself that I could pull off something that looked like it belonged in a patisserie window. I'd spent weeks scrolling through impossibly beautiful desserts, and this one stopped me cold—those perfect V-shaped wedges of color stacked like a jewel box. What hooked me wasn't just the looks; it was the promise that each slice would taste completely different, a little flavor surprise with every bite. The project felt ambitious but surprisingly manageable, and I loved that it rewarded patience rather than advanced technique. By the time my guests arrived, I was giddy watching them gasp when I cut into it.
I still remember my sister's face when I slid the first slice onto her plate—she actually paused mid-conversation. There was this moment of genuine surprise, like I'd created something magical in my regular kitchen with my regular hands. She took a bite and immediately asked me to teach her how to make it, which meant everything because she's the confident baker in our family and I'm usually the one asking her questions. That dessert somehow became the bridge between "that's so impressive" and "okay, this is actually doable," and now it's the thing I make when I want to feel quietly victorious.
Ingredients
- Whole milk and heavy cream: These create the silky base that holds everything together—the milk keeps it light while the cream adds richness that makes each bite melt on your tongue.
- Granulated sugar: Dissolve it completely over gentle heat so you don't get any grittiness disrupting the smooth texture you're after.
- Powdered gelatin or sheets: The blooming step is non-negotiable; it plumps up the gelatin so it dissolves evenly and gives you that perfect wobble without mushiness.
- Vanilla extract: A small amount adds warmth and complexity that balances the brightness of the fruit purees.
- Fruit purees and food coloring: Match them as closely as you can—raspberry red, mango orange, kiwi green, blueberry blue, blackberry purple—because the visual payoff is half the magic here.
- Digestive biscuits or graham crackers: The buttery base anchors the whole thing and gives you something to bite through before you hit the jewel-toned layers above.
- Unsalted butter: Melted and mixed with the crumbs, it creates that perfect slightly-crumbly-but-holds-together texture that doesn't overpower the delicate gelatin.
Tired of Takeout? 🥡
Get 10 meals you can make faster than delivery arrives. Seriously.
One email. No spam. Unsubscribe anytime.
Instructions
- Lay your foundation:
- Crush your biscuits into fine crumbs—some tiny granules, some slightly larger—and mix them thoroughly with warm melted butter until it looks like wet sand. Press this firmly into your springform pan lined with parchment paper, using the bottom of a measuring cup to get it even and compact, then refrigerate while you move forward.
- Wake up your gelatin:
- Sprinkle it over cold water and let it sit undisturbed for exactly 5 minutes so it absorbs the liquid and blooms (if using sheets, soak them and gently squeeze out the excess water). This step is what prevents lumpy, grainy gelatin later.
- Create the creamy base:
- Heat milk, cream, and sugar together over medium heat, stirring occasionally, until the sugar dissolves and the mixture steams but never boils—you want it hot enough to activate the gelatin but not so hot that it breaks down. Remove from heat, add your bloomed gelatin, and stir steadily until there's no hint of graininess, then add vanilla and mix one more time.
- Paint with flavor and color:
- Divide the warm mixture into 5 equal portions and add a different fruit puree and matching food coloring to each one, stirring thoroughly so the color is completely even. The fruit puree brings both flavor and natural sweetness that deepens each layer.
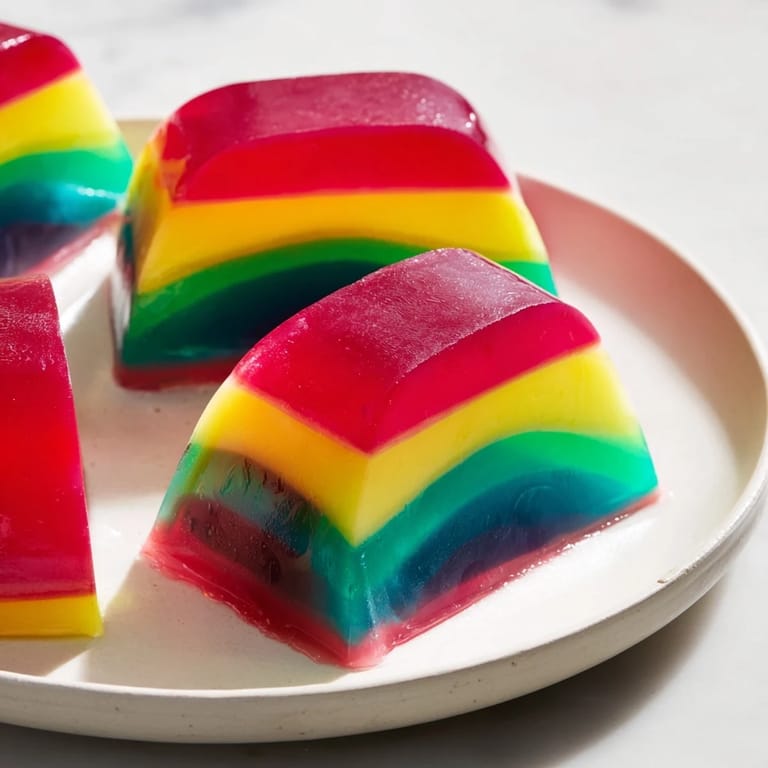
- Build your kaleidoscope:
- Use aluminum foil or cardboard dividers to create 5 V-shaped sections in your pan (think of a pie cut into wedges, meeting at the center). Pour each colored mixture carefully into its designated section and let it chill for 30 minutes until it just sets enough to hold its shape when you gently remove the dividers.
- Free your creation:
- Run a thin knife around the springform edge, then carefully release and lift away the pan sides to reveal your pattern. Take a breath here—this is the moment when all that patience pays off.
- Final chill:
- Give it at least 2 more hours in the refrigerator so the gelatin fully sets and the flavors settle into each other. Cold gelatin is firm enough to slice cleanly without smudging the colors.
 Save Pin
 There's a quiet moment that happens when you're plating this dessert and a slice releases cleanly from the pan, all five colors visible in their perfect wedges. I catch myself slowing down, actually looking at what I've made, instead of rushing to the next thing. It's a small dessert, but it reminds me that beautiful food doesn't have to be complicated—it just needs patience, attention, and the right sequence of steps.
Customizing Your Color Palette
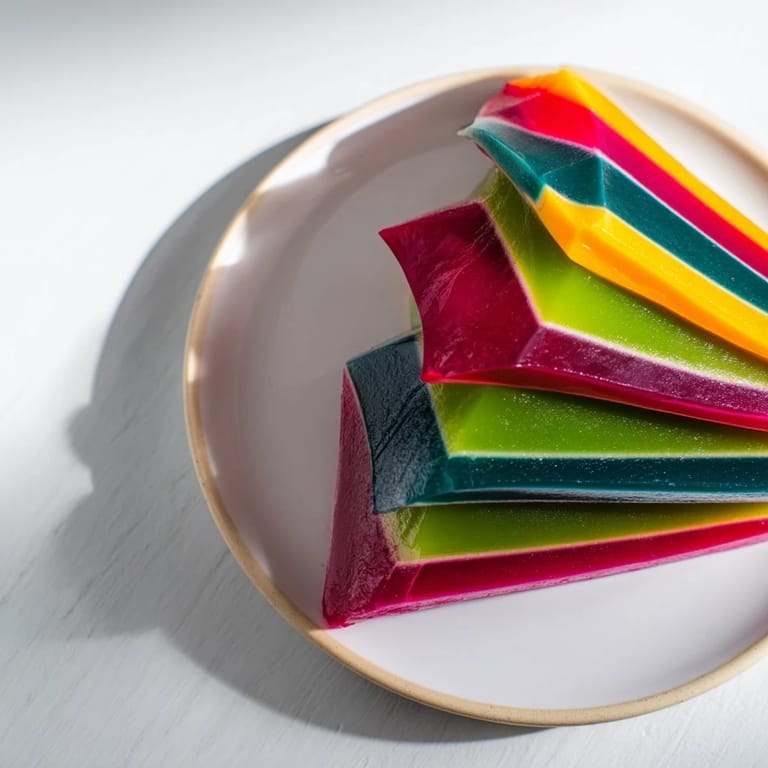
One of my favorite discoveries was realizing you don't have to stick to my exact fruit and color combinations—the whole joy of The Kaleidoscope is that it adapts to what you have and what you love. I've made it with passion fruit yellow, strawberry pink, mint green, and blackberry deep purple, and honestly it looked even better than the original. The only thing that matters is that your purees and food coloring match reasonably well, because the visual impact is what makes people stop and stare. Pick fruits you actually enjoy eating, because every bite will taste like that flavor first.
Making It Your Own
The beauty of this dessert is how flexible it is once you understand the technique—I've made it with coconut cream for a lighter version, added a tiny pinch of cardamom to the base mixture, and once even experimented with a honey drizzle between layers (though that made it slightly harder to unmold). You could serve it with fresh whipped cream, a scatter of crushed freeze-dried fruit, or just on its own if you want the colors and flavors to speak for themselves. The structure holds up in the refrigerator for up to three days, which makes it a smart choice for dinner parties where you want something that looks impressive but doesn't demand last-minute fussing.
Storage and Serving Wisdom
Keep your finished Kaleidoscope covered loosely in the refrigerator—the gelatin is delicate and picks up other flavors easily, so a loose tent of plastic wrap or even an overturned bowl works better than an airtight container. When you're ready to serve, a sharp knife dipped in warm water and wiped clean between each slice gives you the clearest cuts, and plating it on a chilled plate keeps the gelatin from weeping.
- If you're serving at a dinner party, slice it just before guests arrive so the colors stay vivid and the edges don't soften.
- For a vegan version, swap agar-agar for the gelatin and use coconut milk and coconut cream in equal parts for the base mixture.
- Always let cold desserts come out about 5 minutes before eating—gelatin that's too cold can feel rubbery, and you lose some of the flavor complexity.
 Save Pin
 This dessert is proof that patience and precision create something that tastes as good as it looks—and when your guests ask for the recipe, you'll know exactly which steps matter most. I hope you make it and discover your own favorite fruit and color combinations along the way.
Recipe FAQs
- → How do I achieve the vivid colors in the dessert?
Use gel or liquid food coloring matched to each fruit purée and add them to the creamy mixture before layering for bright, distinct hues.
- → Can I substitute gelatin for a vegan option?
Yes, agar-agar can be used instead of gelatin, paired with coconut milk and cream to maintain the set and texture.
- → What is the purpose of the V-shaped dividers?
They help create distinct, visually stunning segments by separating each colored mixture during chilling, enhancing the kaleidoscopic effect.
- → How long should the dessert be chilled before serving?
Chill for at least 3 hours total, including initial setting and final chilling after removing dividers, to allow layers to fully firm up.
- → What base works best for this layered creation?
A crushed digestive biscuit or graham cracker base mixed with melted butter provides a firm, buttery foundation complementing the creamy layers.