 Save Pin
 My youngest came home from college one weekend craving chicken parm but complaining that sitting down for a full plate felt too formal. We stood in the kitchen brainstorming, and I grabbed a tortilla from the fridge on impulse. What started as a lazy experiment turned into the most requested dinner in our house. Now every time I make these wraps, someone inevitably eats theirs over the sink because they can't wait to sit down.
I made these for a casual Friday night with neighbors, and everyone kept asking if I'd ordered takeout from some secret Italian spot. The way the cheese stretches when you bite into a warm wrap, combined with that crispy chicken and tangy marinara, creates an almost ridiculous level of satisfaction. One friend admitted she ate two and a half before realizing she'd forgotten about the salad on the table. That's the kind of distraction good food should cause.
Ingredients
- Boneless, skinless chicken breasts: Slicing them horizontally into thin cutlets is the secret to quick cooking and even breading coverage.
- All-purpose flour: This first dredge helps the egg stick, creating a foundation for the crispy coating.
- Eggs: Beat them well so the breadcrumbs adhere evenly without clumps.
- Italian-style breadcrumbs: The seasoning in these saves time, but plain breadcrumbs work if you boost the herbs.
- Grated Parmesan cheese: Mixing this into the breading adds a salty, nutty layer that makes every bite more complex.
- Garlic powder, dried oregano, salt, and black pepper: These bring the Italian-American flavor profile to life without needing fresh ingredients.
- Vegetable oil: Use enough to come halfway up the chicken for even frying and that perfect golden crust.
- Large flour tortillas: Burrito-size tortillas are essential, smaller ones will tear when you try to wrap everything up.
- Marinara sauce: A good jarred sauce works beautifully here, save the homemade stuff for pasta night.
- Shredded mozzarella cheese: This melts into gooey pockets that hold the wrap together and make every bite indulgent.
- Fresh basil leaves: Optional but worth it, the brightness cuts through the richness in a way dried basil can't.
Tired of Takeout? 🥡
Get 10 meals you can make faster than delivery arrives. Seriously.
One email. No spam. Unsubscribe anytime.
Instructions
- Prep the Chicken:
- Slice each chicken breast horizontally to create four thin cutlets, pressing gently with your palm to keep them steady. Thinner pieces cook faster and fit better in the wraps.
- Set Up Your Breading Station:
- Arrange three shallow dishes with flour in the first, beaten eggs in the second, and the breadcrumb mixture (breadcrumbs, Parmesan, garlic powder, oregano, salt, and pepper) in the third. This assembly line makes the process smooth and less messy.
- Coat the Chicken:
- Dredge each cutlet in flour, shaking off excess, then dip into the egg, letting extra drip off. Press firmly into the breadcrumb mixture on both sides so the coating sticks.
- Fry Until Golden:
- Heat oil in a large skillet over medium-high heat until shimmering. Fry each cutlet for 3 to 4 minutes per side until golden brown and cooked through, then transfer to paper towels to drain.
- Wipe and Warm:
- Clean out the skillet quickly with a paper towel. Warm your tortillas in a dry pan or microwave for about 20 seconds until they're soft and pliable.
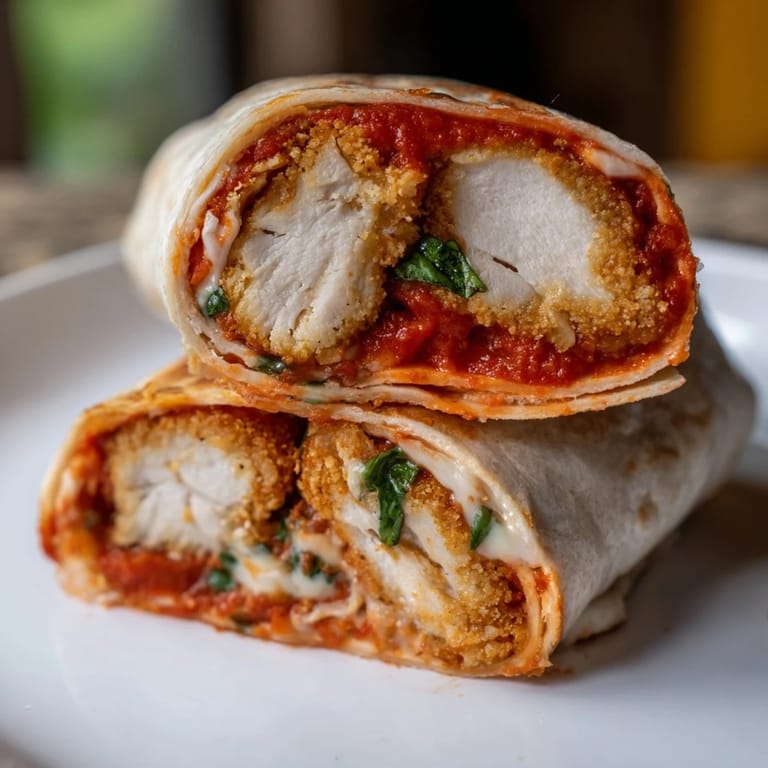
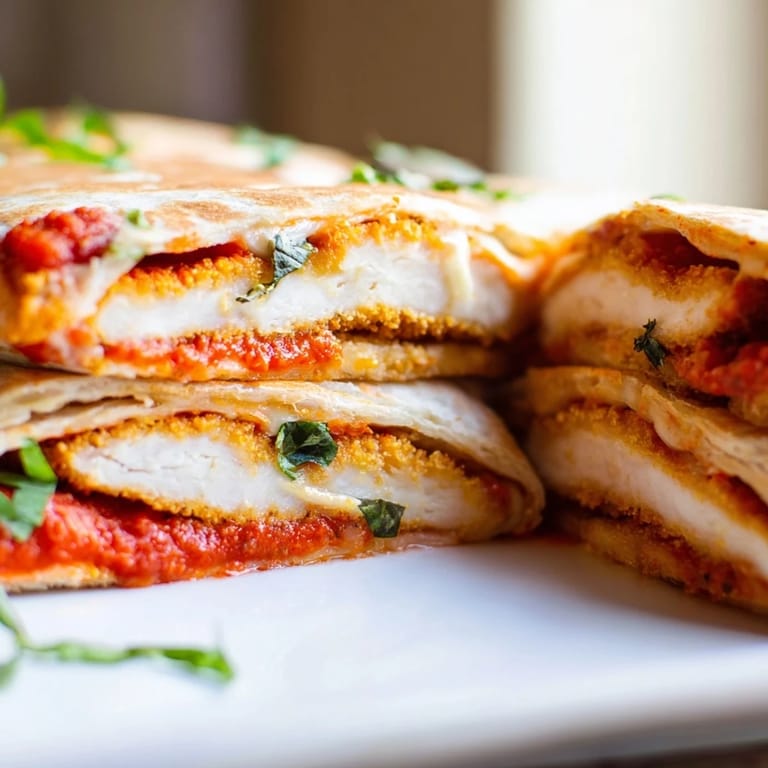
- Assemble the Wraps:
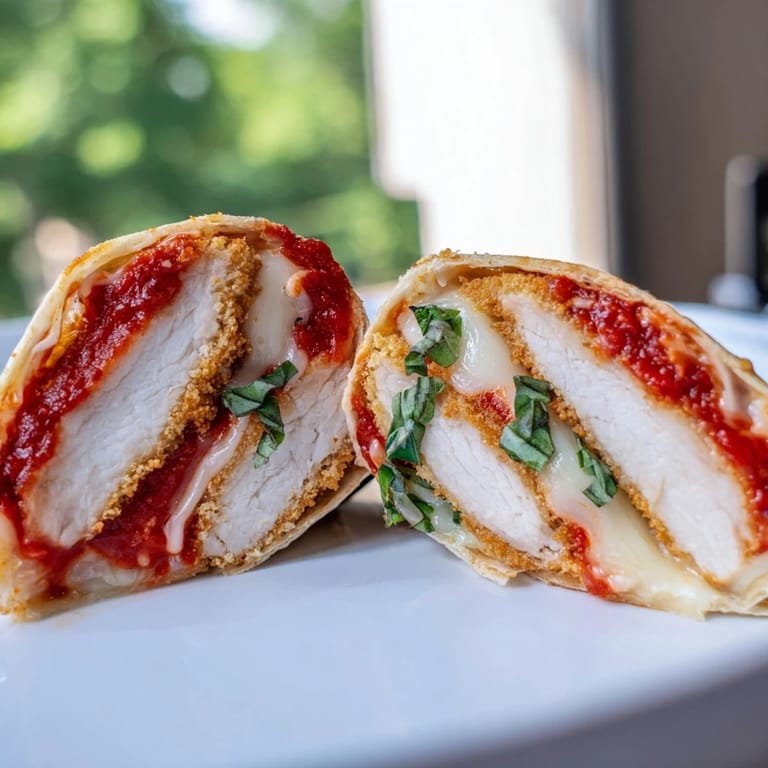
- Spoon about a quarter of the marinara sauce into the center of each tortilla, then place a crispy chicken cutlet on top. Sprinkle with mozzarella and fresh basil if using.
- Roll It Up:
- Fold in the sides of the tortilla, then roll tightly from the bottom up, keeping everything snug inside. A tight roll prevents the filling from spilling out.
- Crisp the Wraps (Optional but Recommended):
- Place wraps seam-side down in the skillet over medium heat for 2 to 3 minutes per side. This step crisps the tortilla and melts the cheese into gooey perfection.
- Serve Hot:
- Cut each wrap in half on the diagonal and serve immediately with extra marinara sauce on the side for dipping. The contrast between crispy exterior and tender filling is best enjoyed right away.
 Save Pin
 There's something about holding a warm wrap in your hands, feeling the heat through the tortilla, that makes food feel more personal. My husband once took these on a road trip, wrapped in foil, and said they tasted even better eaten in the car with the windows down. I'm not sure if that's true or just the freedom of eating without plates, but either way, these wraps have become more than dinner, they're a mood.
Variations to Try
I've swapped in turkey cutlets when chicken wasn't on sale, and honestly, no one noticed the difference. For a lighter version, try baking the breaded cutlets at 400 degrees for about 15 minutes instead of frying, though you'll sacrifice some of that deep golden crunch. Adding sautéed spinach or roasted red peppers gives the wraps a pop of color and a slightly sweeter, earthier flavor that feels a bit more grown-up. One adventurous night I used pepper jack cheese instead of mozzarella, and the subtle heat made my teenagers actually ask for seconds.
Pairing Suggestions
These wraps are rich and filling, so I usually serve them with something light and crisp on the side. A simple arugula salad with lemon vinaigrette cuts through the cheese and fried chicken beautifully. If you want to lean into the Italian-American vibe, a chilled glass of Pinot Grigio or even a sparkling water with a twist of lemon feels just right. Sometimes I'll put out a bowl of marinated olives and cherry tomatoes, and suddenly it feels like a casual dinner party instead of a Tuesday.
Storage and Reheating
Leftover wraps keep in the fridge for up to two days if wrapped tightly in foil. Reheat them in a skillet over medium heat rather than the microwave, the tortilla crisps back up and the cheese melts again instead of turning rubbery. I've also frozen the breaded, uncooked chicken cutlets with parchment paper between each piece, then fried them straight from frozen, adding an extra minute per side. It's a weeknight shortcut I stumbled into out of necessity and now use on purpose.
- Wrap leftovers individually in foil to keep them from drying out in the fridge.
- Reheat in a dry skillet for the best texture, flipping once halfway through.
- Freeze uncooked breaded cutlets for up to a month and fry from frozen when you need a quick dinner.
 Save Pin
 Every time I make these wraps, someone ends up standing at the counter eating with their hands, laughing because they couldn't wait. That's exactly the kind of meal I want to put on the table, one that's too good to bother with formality.
Recipe FAQs
- → How do I keep the chicken crispy when adding sauce and cheese?
Fry the chicken until fully cooled on paper towels before assembly. This allows the breading to set. For extra crispness, optionally pan-toast the assembled wrap for 2-3 minutes per side in a dry or lightly oiled skillet to crisp the tortilla while melting the cheese.
- → Can I prepare these wraps ahead of time?
Yes, assemble the wraps without toasting, wrap individually in foil, and refrigerate for up to 24 hours. Toast before serving for best texture. Alternatively, fry the chicken cutlets ahead and store in the refrigerator; reheat gently in a skillet before assembling.
- → What are good substitutes for chicken?
Turkey cutlets work wonderfully and cook in the same timeframe. Plant-based cutlets are also an excellent vegetarian option. Pound them to similar thickness for even cooking and consistent breading coverage.
- → How should I store leftovers?
Store cooked chicken and assembled wraps separately in airtight containers in the refrigerator for up to 3 days. Rewarm the chicken gently in a low oven to avoid drying it out. Reheat the wrap in a skillet to restore crispness.
- → What tortillas work best for this?
Large flour tortillas (burrito size) are ideal as they're flexible and sturdy enough to hold fillings without tearing. Whole wheat varieties also work well. Warm tortillas before filling to improve pliability and prevent cracking when rolling.
- → Can I bake instead of pan-fry the chicken?
Yes, bake breaded chicken at 400°F for 15-18 minutes until golden and cooked through. While less crispy than pan-frying, it reduces oil usage. For a crispier result, brush with a light oil spray before baking.